Internet of Things (IoT) has been around for a while and It is gaining momentum day by day. Billions of devices have been connected to the global network and the number is exponentially growing . Very often, tremendous amount of data generated by those connected devices are sent across long routes to the Cloud for processing. With edge computing, the data can be pre-processed/analyzed at the edge (close to where the data was generated) to reduce unnecessary backhaul traffic to the Cloud or even help to make decision based on the data right at the edge.
In my research, I need to collect data samples from various positions and provide the data as input for AI training happening at the Edge. The refined/analyzed data then will be sent to IBM Cloud for persisting and performing more advanced analyzing as needed. The task would have been very challenging if I had to do it manually but thanks to the affordable Tello EDU drone, I could automate it with very little coding effort.
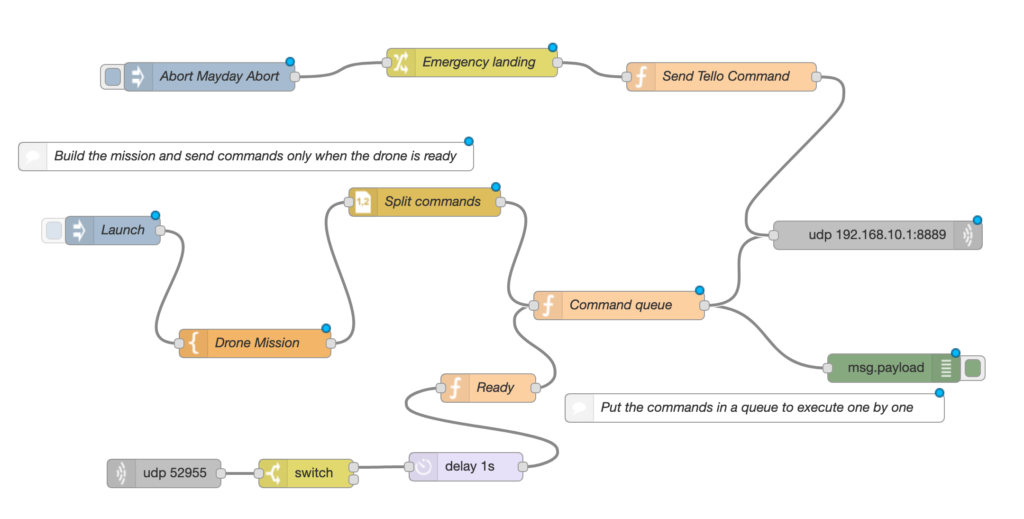
I soldered one edge node which is a Raspberry Pi 0 W with a bunch of microservices running in side, to the drone and let it fly automatically on a pre-defined route by deploying a simple Node-Red flow on it. The drone has quite comprehensive set of API for us to program with. Using Node-Red does not look that appealing but practical and it does the job with very little code. The trick here is to “compose” the commands, then split and put them into a queue for execution one by one.
The outcome looks promising in a test flight:
Here is the full Node-Red flow that I deployed and run:
[{"id":"4dbfac54.ca76e4","type":"tab","label":"Auto Pilot Flight Plan","disabled":false,"info":""},{"id":"1e1c37d9.fea328","type":"debug","z":"4dbfac54.ca76e4","name":"","active":true,"tosidebar":true,"console":false,"tostatus":false,"complete":"payload","targetType":"msg","x":949,"y":394,"wires":[]},{"id":"65815c4d.3b3774","type":"function","z":"4dbfac54.ca76e4","name":"Command queue","func":"// Use a message queue to handle this mission\nvar queue = context.get(\"queue\") || [];\nvar busy = context.get(\"busy\") || false;\n\n// Ready for processing next command\nif (msg.hasOwnProperty(\"ready\")) {\n if (queue.length > 0) {\n var message = queue.shift();\n msg.payload = message.command;\n return msg;\n } else {\n context.set(\"busy\", false);\n }\n// This happens the first time the node is processed\n} else {\n // This builds up the command queue\n if (busy) {\n queue.push(msg.payload);\n context.set(\"queue\", queue);\n // When the command queue is done building we pass the message to the next node and begin the mission\n } else {\n context.set(\"busy\", true);\n msg.payload = msg.payload.command;\n return msg;\n }\n}\n\n// We only want messages to be passed based on the logic above\nreturn null;","outputs":1,"noerr":0,"x":659,"y":328,"wires":[["1e1c37d9.fea328","d5711baa.17ec8"]]},{"id":"7a8899f8.e50bc","type":"function","z":"4dbfac54.ca76e4","name":"Ready","func":"msg.ready = true;\nreturn msg;","outputs":1,"noerr":0,"x":521,"y":415,"wires":[["65815c4d.3b3774"]]},{"id":"d5711baa.17ec8","type":"udp out","z":"4dbfac54.ca76e4","name":"","addr":"192.168.10.1","iface":"","port":"8889","ipv":"udp4","outport":"52955","base64":false,"multicast":"false","x":932,"y":254,"wires":[]},{"id":"5d8260bc.25d148","type":"udp in","z":"4dbfac54.ca76e4","name":"","iface":"","port":"52955","ipv":"udp4","multicast":"false","group":"","datatype":"utf8","x":179,"y":505,"wires":[["6f1cadd6.e7effc"]]},{"id":"6f1cadd6.e7effc","type":"switch","z":"4dbfac54.ca76e4","name":"","property":"payload","propertyType":"msg","rules":[{"t":"eq","v":"ok","vt":"str"},{"t":"else"}],"checkall":"true","repair":false,"outputs":2,"x":329,"y":505,"wires":[["54b3260c.3f662"],[]]},{"id":"f54fadcc.3cdd7","type":"template","z":"4dbfac54.ca76e4","name":"Drone Mission","field":"payload","fieldType":"msg","format":"handlebars","syntax":"plain","template":"command\ntakeoff\nup 70\nforward 450\ncw 90\nforward 450\ncw 90\nforward 450\ncw 90\nforward 400\ncw 90\nforward 400\ncw 90\nforward 400\ndown 30\ncw 90\nforward 350\ncw 90\nforward 350\ncw 90\nforward 350\nup 50\ncw 90\nforward 300\ncw 90\nforward 300\ncw 90\nforward 300\ncw 90\nforward 250\ncw 90\nforward 250\ncw 90\nforward 250\nup 60\ncw 90\nforward 200\ncw 90\nforward 200\ncw 90\nforward 200\ndown 50\ncw 90\nforward 100\ncw 90\nforward 100\ncw 90\nforward 100\ncw 90\nforward 50\ncw 90\nforward 50\ncw 90\nforward 50\ncw 90\nup 120\nflip f\nforward 50\ncw 90\nforward 50\ncw 90\nforward 50\ncw 90\nflip f\nforward 100\ncw 90\nforward 100\ncw 90\nforward 100\ncw 90\nflip f\nforward 150\ncw 90\nforward 150\ncw 90\nforward 150\ncw 90\nforward 200\ncw 90\nforward 200\ncw 90\nforward 200\ncw 90\nforward 250\ncw 90\nforward 250\ncw 90\nforward 250\ncw 90\nforward 300\ncw 90\nforward 300\ncw 90\nforward 300\ncw 90\nforward 350\ncw 90\nforward 350\ncw 90\nforward 350\ncw 90\nforward 350\ncw 90\nland","output":"str","x":275,"y":368,"wires":[["d109059.e2b9578"]]},{"id":"d109059.e2b9578","type":"csv","z":"4dbfac54.ca76e4","name":"Split commands","sep":",","hdrin":"","hdrout":"","multi":"one","ret":"\\n","temp":"command","skip":"0","x":454,"y":219,"wires":[["65815c4d.3b3774"]]},{"id":"3da54070.a7b7f8","type":"inject","z":"4dbfac54.ca76e4","name":"Launch","topic":"","payload":"true","payloadType":"bool","repeat":"","crontab":"","once":false,"onceDelay":0.1,"x":125,"y":249,"wires":[["f54fadcc.3cdd7"]]},{"id":"f5ab9078.b0e4b","type":"comment","z":"4dbfac54.ca76e4","name":"Build the mission and send commands only when the drone is ready","info":"","x":265.5,"y":171,"wires":[]},{"id":"54b3260c.3f662","type":"delay","z":"4dbfac54.ca76e4","name":"","pauseType":"delay","timeout":"1","timeoutUnits":"seconds","rate":"1","nbRateUnits":"1","rateUnits":"second","randomFirst":"1","randomLast":"5","randomUnits":"seconds","drop":false,"x":497.5,"y":498,"wires":[["7a8899f8.e50bc"]]},{"id":"beb44409.95d2f8","type":"inject","z":"4dbfac54.ca76e4","name":"Abort Mayday Abort","topic":"","payload":"land","payloadType":"str","repeat":"","crontab":"","once":false,"onceDelay":"","x":227,"y":87,"wires":[["8eabbf5a.05afe"]]},{"id":"8eabbf5a.05afe","type":"change","z":"4dbfac54.ca76e4","name":"Emergency landing","rules":[{"t":"delete","p":"payload","pt":"msg"},{"t":"set","p":"payload.tellocmd","pt":"msg","to":"land","tot":"str"},{"t":"set","p":"payload.distance","pt":"msg","to":"0","tot":"str"}],"action":"","property":"","from":"","to":"","reg":false,"x":504,"y":72,"wires":[["cc199cfa.0a5a2"]]},{"id":"cc199cfa.0a5a2","type":"function","z":"4dbfac54.ca76e4","name":"Send Tello Command","func":"var telloaction ;\n\nif( msg.payload.distance != \"0\") {\n telloaction = new Buffer( msg.payload.tellocmd + ' '+ msg.payload.distance );\n} else {\n telloaction = new Buffer( msg.payload.tellocmd );\n}\n\nmsg.payload = telloaction;\t\nreturn msg;\n","outputs":1,"noerr":0,"x":767,"y":87,"wires":[["d5711baa.17ec8"]]},{"id":"192bec1a.026024","type":"comment","z":"4dbfac54.ca76e4","name":"Put the commands in a queue to execute one by one","info":"","x":802,"y":436,"wires":[]}]
