
Source-to-Image (S2I) is a framework that makes it easy to write container images that take application source code as an input and produce a new image that runs the assembled application as output. The main advantage of using S2I for building reproducible container images is the ease of use for developers.
As a developer, you don’t need to worry about how your application is being containerized and deployed, you just need to work on your code then deliver to Github. OpenShift will take care of the rest, to make it available to end users.
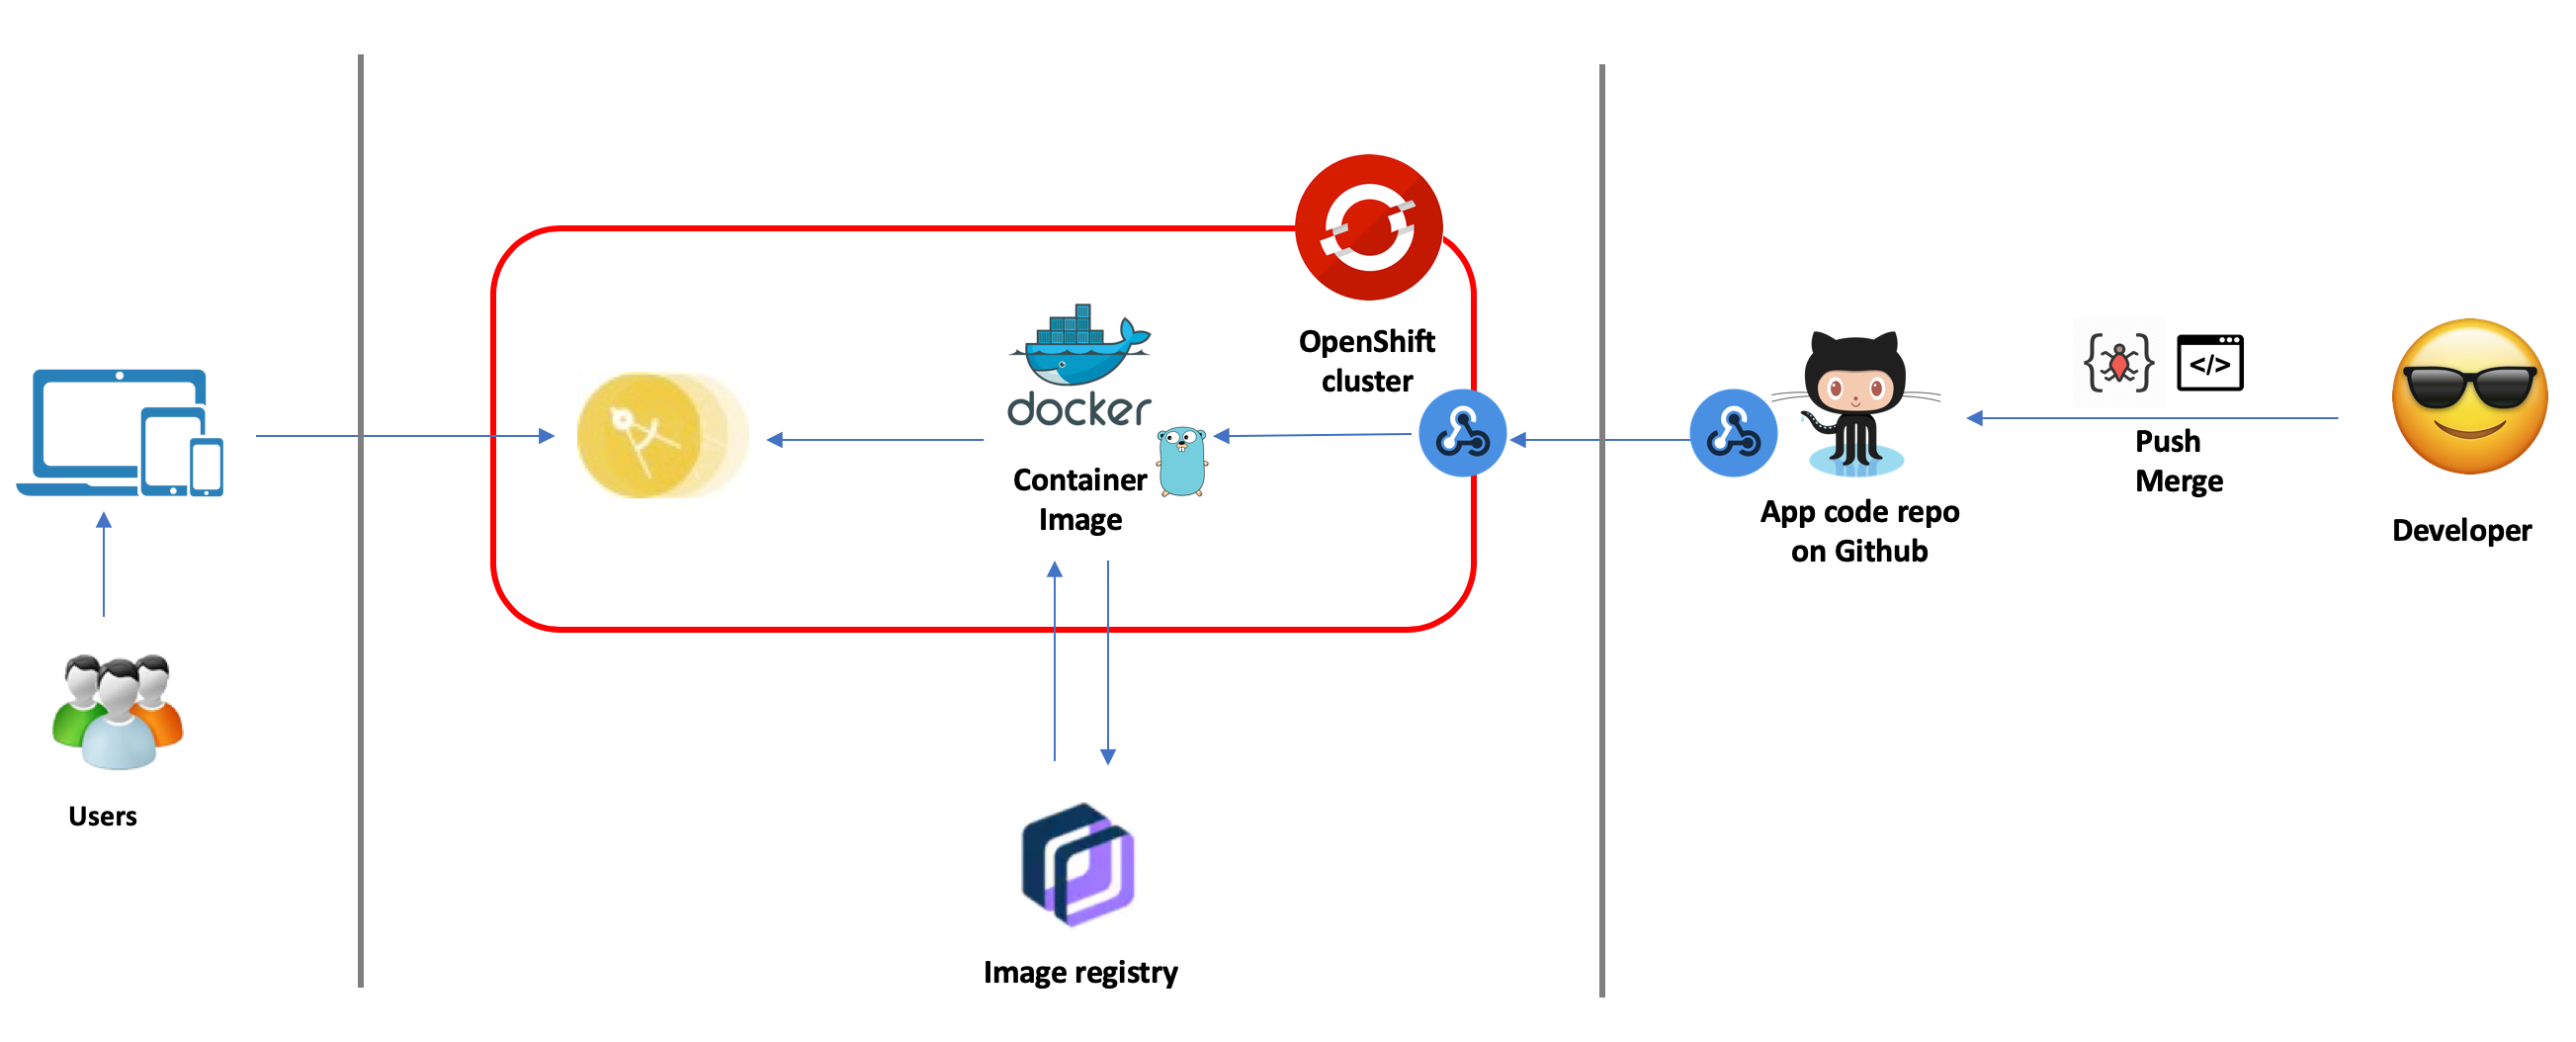
In this tutorial, we will discuss about how to deploy a Golang web application on OpenShift 4 via source to image (aka s2i) framework. We will also talk about how to enable CI/CD using webhook
Here is the architecture overview of the tutorial
Note: I use MacOS for this tutorial, and you can find details in my Github repository as well: https://github.com/dnguyenv/spirited-engineering-go.git
Prerequites
- A OpenShift cluster
- Github account (https://github.com)
- OpenShift cli client (aka
oc) (run$ brew update && brew install openshift-clion your Mac terminal
The app
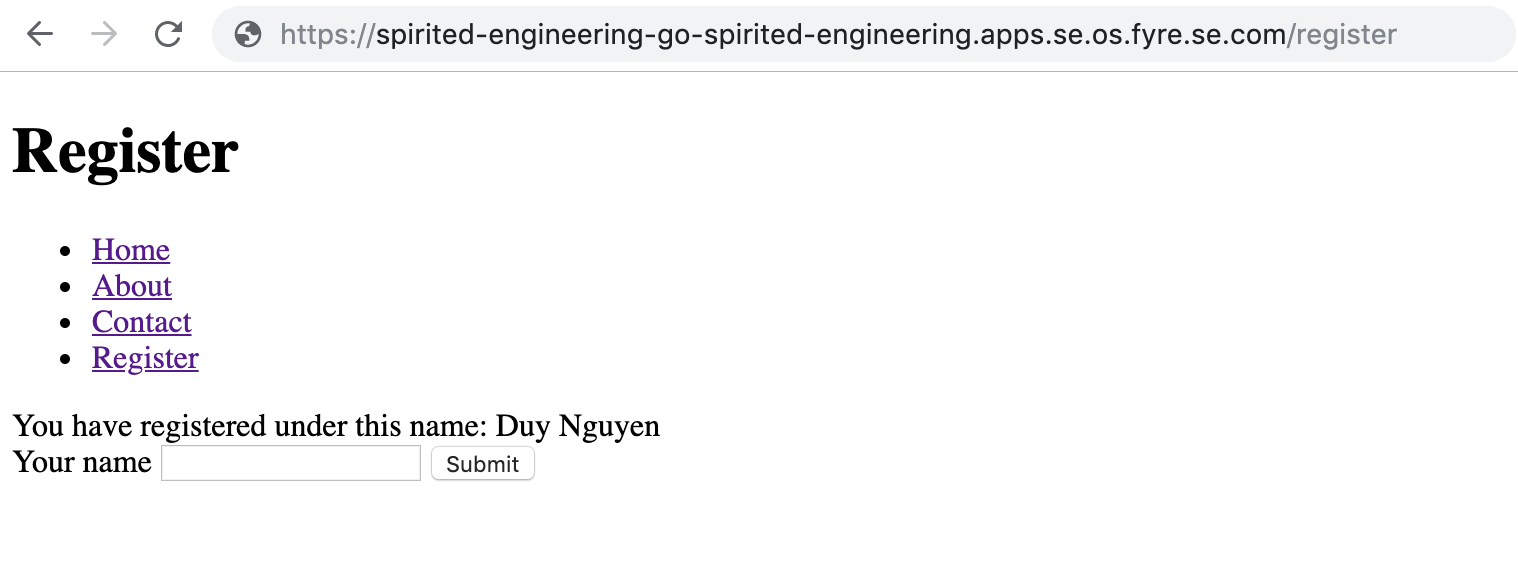
The example application used in this tutorial is a simple Go web app that has a menu to navigate among different pages. The Register page is an html form for the user to submit a name, then the Go server code handles the request and sends the name back for displaying on the page. The app covers how to work with templates in Go.
Here is the structure of the code
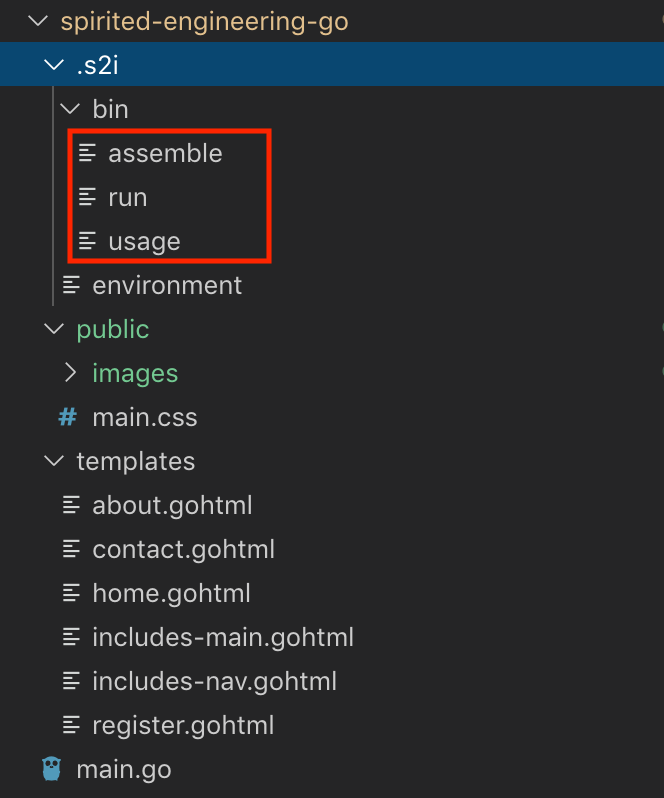
As required by s2i framework, we need to provide assemble and run scripts as minimum to instruct how the code is built and how the built code is executed
assemble script:
#!/bin/bash
set -e
echo "---> Preparing source..."
mkdir -p $S2I_DESTINATION
cd $S2I_DESTINATION
cp -r /tmp/src/* $S2I_DESTINATION/
go build -o /opt/app-root/goexec .
run script:
#!/bin/bash -e
cd $S2I_DESTINATION
/opt/app-root/goexec
Notice that you can put all environment variables necessary for the scripts in the environment file placed in .s2i directory
You can fork the code from here to your git and modify based on your needs: https://github.com/dnguyenv/spirited-engineering-go.git
Login to your OpenShift cluster
$ oc login -u <your-user> -p "access-token" \
https://<your-cluster-api-url>
Example:
$ oc login -u kubeadmin -p "token" \
https://console-openshift-console.apps.se.spirited-engineering.os.fyre.se.com:6443
Create new project
$ oc new-project <project-name>
$ oc project <project-name> #Switch to the newly created project
Example:
$ oc new-project spirited-engineering
$ oc project spirited-engineering
Create new application under the current project
$ oc new-app <your-git-hub-repo-uri> --name <your-app-name>Example:
$ oc new-app https://github.com/dnguyenv/spirited-engineering-go.git \
 --name spirited-engineering-go
Configure OpenShift resources of the app to make the app accessible from outside
Expose the deployment config of the app as a service:
$ oc expose dc <your-app-name> --port <a http port>Example:
$ oc expose dc spirited-engineering-go --port 8080Create a route with tls termination enabled
$ oc create route edge --service=<your-service-name> --port=<a http port>Example:
$ oc create route edge --service=spirited-engineering-go --port=8080Access the app
Get the route information
$ oc get routes
NAME                      HOST/PORT                                                                     PATH   SERVICES                  PORT   TERMINATION   WILDCARD
spirited-engineering-go   spirited-engineering-go-spirited-engineering.apps.se.os.fyre.se.com          spirited-engineering-go   8080   edge          None
You now can access your app from a browser with this url (HOST/PORT value in the output of oc get routes): https://spirited-engineering-go-spirited-engineering.apps.se.os.fyre.se.com
Here is what you may see from this Go web application example:
Enable CI/CD
Now you have the application deployed from your source code on Github all the way to your OpenShift cluster. Lets do 1 step further to make the application deployed automatically whenever you’ve pushed changes to the code on Github. There are different ways to do that but in this example, I’ll walk you through how to do it with webhook
Get the webhook endpoint of the app
Assuming you’re still logged into your OpenShift cluster, run this command to get the webhook endpoint of the app
$ oc describe bc/<your-build-config>The endpoint will show how under Webhook GitHub section. You can grep the URL against the output
Example:
$ oc describe bc/spirited-engineering-go | grep -E 'webhook.*github'You will see something like this:
$ oc describe bc/spirited-engineering-go | grep -E \
 'webhook.*github'

output: URL: https://console-openshift-console.apps.se.os.fyre.se.com:6443/apis/build.openshift.io/v1/namespaces/spirited-engineering/buildconfigs/spirited-engineering-go/webhooks/<secret>/github
So now you need the <secret> value to have the complete webhook uri. You can find that out by
$ oc get bc/<your-build-config> -o template --template \
 '{{index .spec.triggers 0}} {{"\n"}}'
Example:
$ oc get bc/spirited-engineering-go -o template \
--template '{{index .spec.triggers 0}} {{"\n"}}'
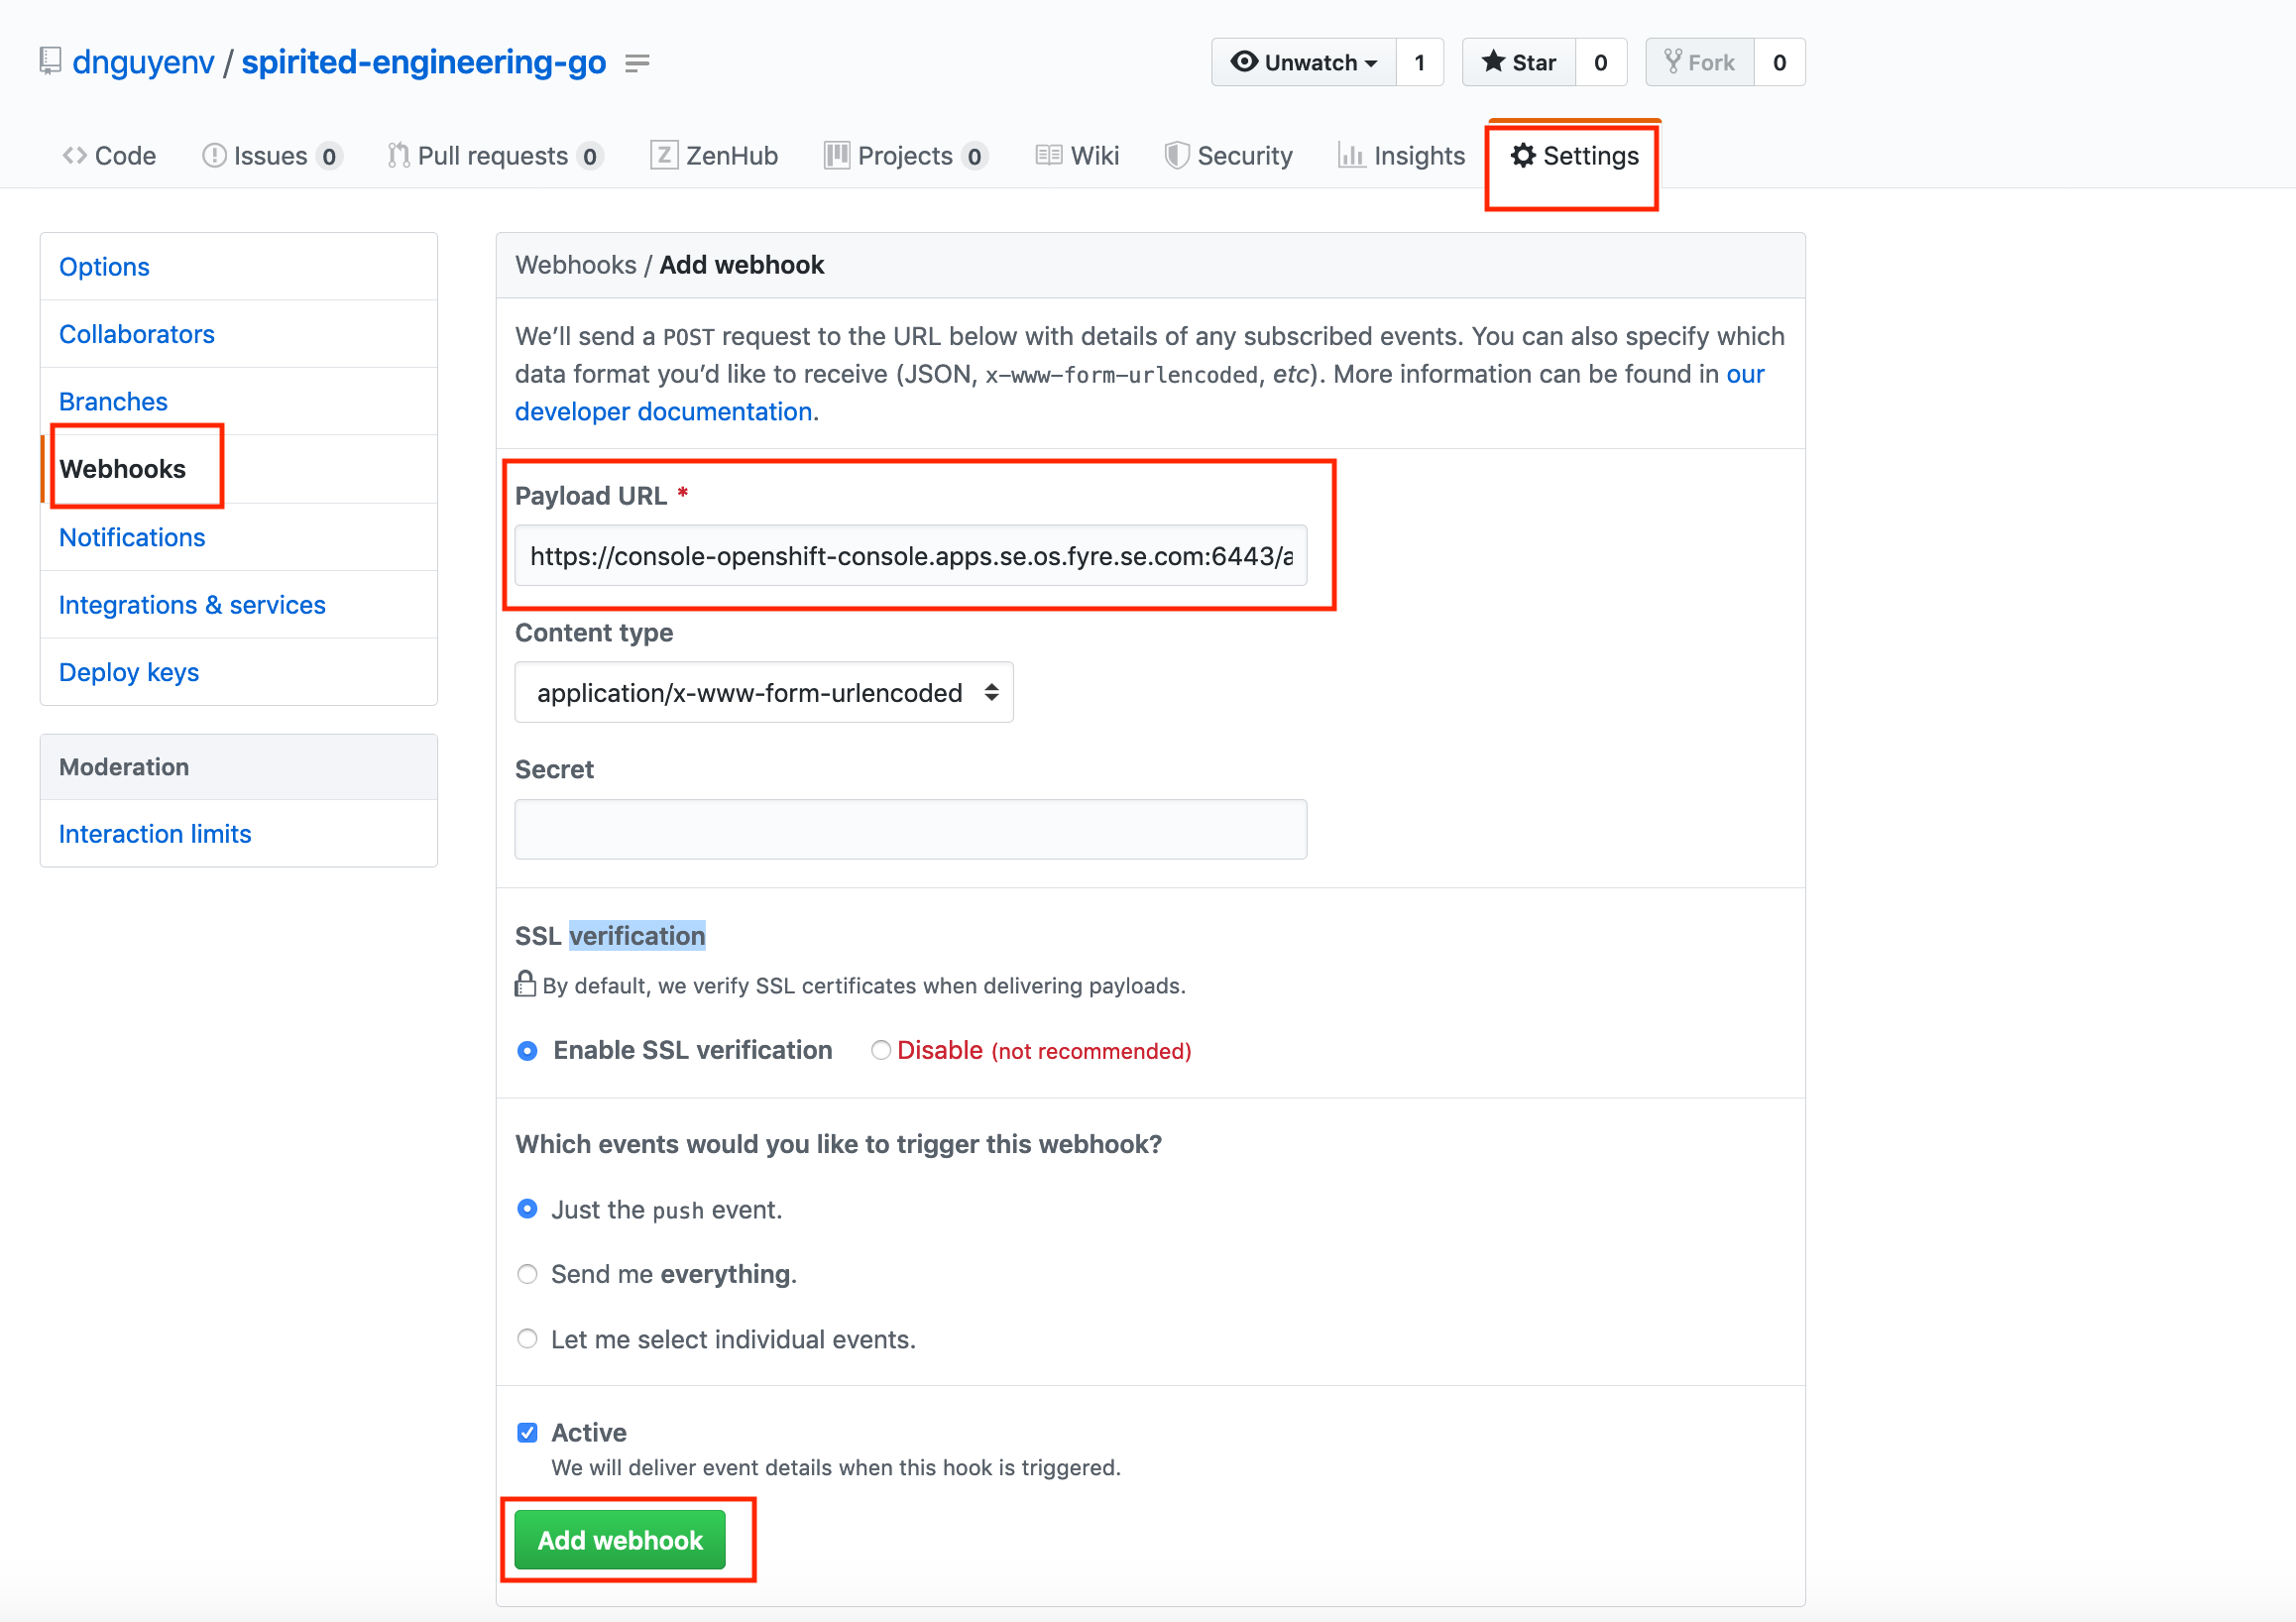
map[github:map[secret:<sometoken>] type:GitHub]Configure webhook for your github repository
Once you have the webhook endpoint, you now can create a github webhook on your source code repository by going to https://github.com/<your-github-id>/<your-repo>/settings/hooks (example: https://github.com/dnguyenv/spirited-engineering-go/settings/hooks)
Something like this:
Now, whenever you push (or merge) any changes into your repository, the webook will send a payload to OpenShift to trigger a build and the changes will be packaged into container(s), deployed and serve the end users.